
I’ve been working on several projects recently that involve working with Forus Research’s Open Stand Model (OSM). These projects have either been in R or Python, and I’ve needed to connect to OSM from both languages.
This article will go through some of the different methods to approach this, the pros and cons of each one, and some considerations. Also, we’ll compare how this works (or doesn’t) in R vs Python.
Why Connect to OSM Through R or Python?
There are all sorts of reasons why you may need to do this. One of the projects involves building a user interface to access OSM in a graphical way. That interface can be built in R or Python with something like Shiny. As part of that tool we need to run OSM.
These languages also offer a host of data analysis features, like plotting and visualizations. Managing data through code also allows the output from OSM to be fed into different modelling processes.
Different Methods to Connect
Broadly speaking there are two different ways to run OSM from either Python or R. The first is to call the OSM executable from the code, and pass the command file and desired variant. This is the same way you would run OSM from the command line, or through a batch file.
The second way is to call methods inside the OSM DLLs. This method has the advantage of portability and flexibility. Portability because there are less dependencies than dealing with an executable, and flexibility because with the DLL methods exposed, we have finer control over how OSM runs.
The simplest route is using the command line. The Python or R script can prepare the input data, build the OSM command file, execute OSM through the command line, and then read in the CSV files that it creates. No reason to make it more complicated than that (unless you need to).
This can be done through R using the following code:
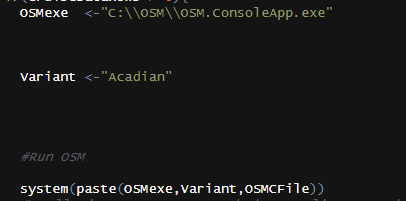
There is some work obviously to configure the OSM input command file, but connecting and running the tool is relatively straightforward.
Here is an equivalent call in Python:
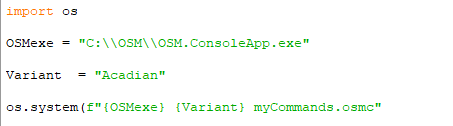
Note the use of formatted strings in the system call.
Disadvantages of Using the Executable
Calling the EXE is straightforward, and probably works for most situations. The approach comes with drawbacks though.
First, you’re reliant on the location and installation of the EXE. Depending on how your program needs to be deployed, this could be problematic and it’s another thing to keep track of.
Second, if the program is to be deployed on a server or some other environment, running an EXE may not be an option. For instance, the deployment options offered by Posit for their Shiny apps runs almost exclusively on Linux, meaning calling an exe is not an option.
Also, I’ve run into issues with anti-virus and OSM in the past. Easy enough to resolve, but one less thing to deal with. Especially if you are creating a program to be used by other people.
And lastly, there are some limitations with using the EXE in this way. You don’t have access to the OSM API, which limits the scope of the program. Now, you can access most of these features through different commands, but if you need an especially fancy program, it is far better to connect directly to the DLL.
Connecting to the DLL through Python
Both R and Python can connect to the OSM DLLs directly, though the python connection is much more straightforward.
Python integrates quite well with the .net world (which is what OSM is written in) through the module Pythonnet. While this was straight forward to get working, it did not work right out of the box and required a bit of tinkering.
I’m far more familiar with Python than I am with C# (or .net or however people refer to this). While Python and C# integrate far closer than I would have thought (You can basically just run C# code directly in Python), this still gets tricky in a few areas.
First step is to download the portable version of OSM, which you can do from the Forus Research site. This version contains all the DLLs that we need to connect to. The main DLLs we need are the OSM.Management.DLL and the variant DLL (In this case, the Acadian variant). Both are included with the portable version of OSM.
You will then need to install Pythonnet through PIP (Or wherever you get your Python Packages from).
Here is the first nuance to getting this working. Pythonnet has several different flavors (or versions or styles) of .net that it can use. The one you need depends on your operating system, and what the DLLs were written in. I managed to get OSM working by loading the “Core” version of .Net. That can be done with the following code.
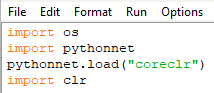
Here’s the nuanced bit. That call to “Pythonnet.load” has to be made before we import the CLR module (More on that later). This is one of those weird cases where the call from one module affects how another module is imported. Pythonnet loading the .net version changes some kind of state somewhere, which thus affects how clr gets imported.
If you want to do this I recommend using the “coreclr” version, if that doesn’t work you can try the others, but this is what worked for me.
(Side note… Looking at the Pythonnet doc, it appears “coreclr” is loaded by default, but I couldn’t get this to work without explicitly loading it, so…)
With the right .net version loaded we can actually call some of the code. This is done through the clr module. CLR stands for “Common Language Runtime” and is a feature of .net that allows different languages to run in the .net environment. The Pythonnet module is basically a bridge between the Python Interpreter and the CLR allowing .net code to run from Python.
The CLR is where we will manage our references to the DLL. We just have to pass the required path.

Now’s where things get weird. Or at least they get weird to me. With the DLL reference added, we can now reference objects and methods directly from the Python script.

First, import the OSM module (or I guess technically the namespace because this is actually .net code). With this we need to load our desired variant (Acadian in this case). This is done with the Load method in the CommandableRuntime class.
Load is a static method, and returns a commendableRuntime object of the appropriate variant. We just pass it the path to that variant’s DLL, and the class of the object representing that variant.
Notice the use of raw strings in the path above.
The object we just created is what will run our command file, simply by calling the “runCommandFile” method and passing our command file.

This does essentially the same thing as the EXE system call, but won’t require using the actual executable.
I just wanted to be able to run OSM directly from the DLL so the above is enough for me. If you however want to run more customized commands, or manipulate the simulation more, the CLR allows you access to all the methods exposed through the DLL.
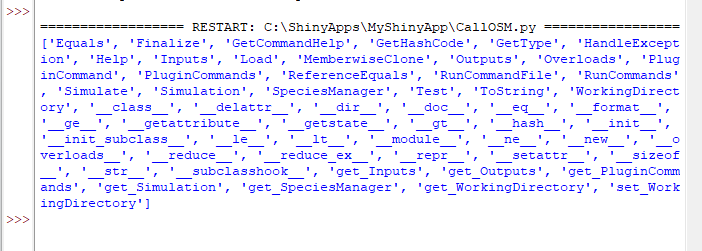
You can find what methods an object has by using the following code:
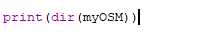
Which produces the following output:
Connecting To the DLL Through R
Doing the same thing in R theoretically follows the same path. I emphasize “theoretically”.
There is a CLR module available for R that is roughly equivalent to Pythonnet. However it looks like the project stopped getting updated somewhere around 2019. I was unable to get this package working with the latest version of R. There is probably a work around for this, but I’m not super familiar with R versions and handling packages that don’t match.
The steps would be similar though. Adding a reference to the DLL, making the appropriate method calls and then working with the results.
Other Ways?
We can bypass the whole DLL/CLR situation by wrapping OSM in something like a REST API. This allows any app to communicate with it through HTTP requests. This is something that R and Python can both do.
I am working on something related to this that will be covered in a future blog post. Until then, thanks for reading.